

Connect a client to the MCP Server
Set up the Keboola MCP Server in your AI client — remote connection, Cursor, Claude Desktop, ChatGPT, Windsurf, VS Code, and Make.
This page sets up the Keboola MCP Server in each supported client. For the tools it exposes and how to restrict them, see the reference.
Keboola MCP Server is hosted on every multi-tenant stack and supports OAuth authentication. You can use the remote server in any AI assistant that supports a remote Streamable HTTP connection and OAuth authentication. Streamable HTTP is the recommended transport method, providing bidirectional streaming for improved performance compared to the deprecated SSE transport.
Remote server setup
Section titled “Remote server setup”If your AI assistant supports a remote connection, connect to Keboola’s MCP Server as follows:
- Obtain the remote server URL of the stack:
https://mcp.<YOUR_REGION>.keboola.com/mcp.- Available stack URLs:
https://mcp.keboola.com/mcphttps://mcp.us-east4.gcp.keboola.com/mcphttps://mcp.eu-central-1.keboola.com/mcphttps://mcp.north-europe.azure.keboola.com/mcphttps://mcp.europe-west3.gcp.keboola.com/mcp
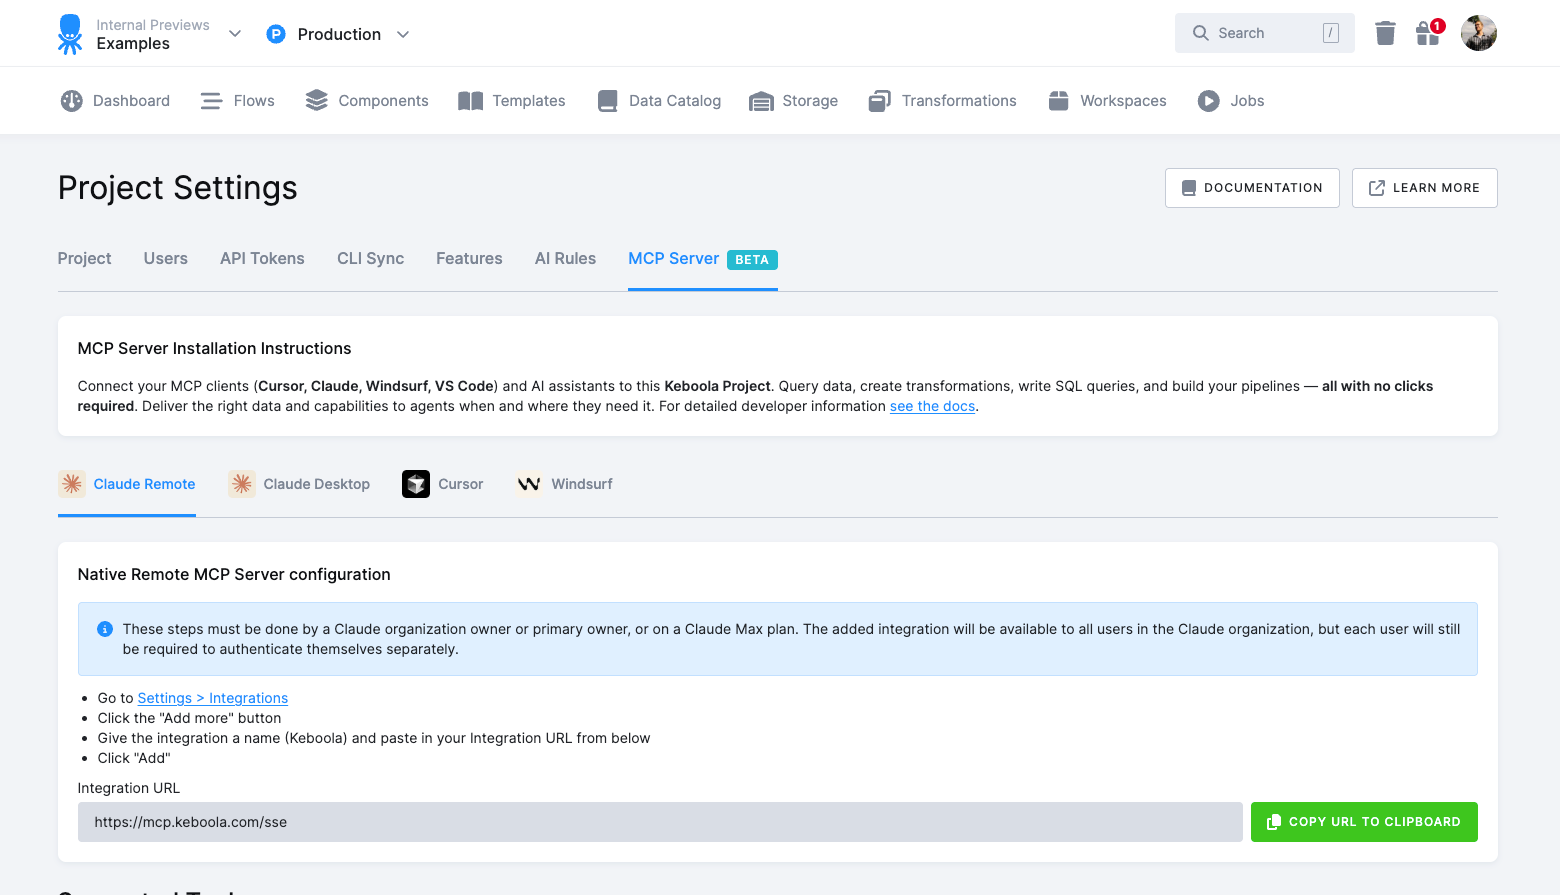
- You can find the URL in your Keboola Project Settings under the MCP Server tab, along with client-specific instructions.
- Available stack URLs:
- Copy the server URL and paste it into your AI assistant’s settings.
- Once you save the settings and refresh your AI assistant, you will be prompted to authenticate with your Keboola account and select the project you want to connect to.
For local deployment options, see the Developer Documentation.
Using with Claude Desktop
Section titled “Using with Claude Desktop”- Go to Settings > Integrations
- Click the “Add more” button
- Give the integration a name (Keboola) and paste in your Integration URL
https://mcp.<YOUR_REGION>.keboola.com/mcp
- Click “Add”
- You’ll be prompted to authenticate with your Keboola account and select the project you want to connect to.
Via mcp-remote adapter
Section titled “Via mcp-remote adapter”If you don’t have a paid version you can still use the mcp-remote adapter to connect Claude Desktop to Keboola’s MCP Server.
NOTE: This method requires you to have Node.js installed on your computer. For more information refer to the Developer Documentation
- Open the Claude menu on your computer and select “Settings…”
- Click on “Developer” in the left-hand bar of the Settings pane, and then click on “Edit Config”
- Paste the following JSON into the config file and save.
{ "mcpServers": { "keboola": { "command": "npx", "args": [ "mcp-remote", "https://mcp.<YOUR_REGION>.keboola.com/mcp" ] } }}- Restart Claude Desktop, you’ll be prompted to authenticate with your Keboola account and select the project you want to connect to.
Using with ChatGPT
Section titled “Using with ChatGPT”ChatGPT Plus and Pro users can connect to Keboola’s MCP Server using custom connectors. Follow these steps to set up the integration:
Step 1: Access ChatGPT settings
Section titled “Step 1: Access ChatGPT settings”- Log in to your ChatGPT Plus or Pro account
- Click on your profile icon in the bottom-left corner of the screen
- From the menu that appears, select Settings
Step 2: Navigate to connectors
Section titled “Step 2: Navigate to connectors”- In the settings window, select the Connectors tab from the left-hand sidebar
- Look for the “Developer mode” option and toggle it on
- Read and acknowledge the warning that appears - this mode allows you to create custom connectors
- In the top-right corner of the Connectors page, click Create
Step 3: Configure the new connector
Section titled “Step 3: Configure the new connector”- A new window will open for the “New Connector” settings
- Name: Give your connector a name, such as “Keboola”
- Description: Provide a brief description (optional)
- MCP Server URL: This is the most important part. You need the specific URL for your Keboola MCP Server:
- Open a new tab and go to your Keboola project settings
- Navigate to
Users & Settings>MCP Server - Copy the MCP Server URL provided there (e.g.,
https://mcp.us-east4.gcp.keboola.com/mcp) - Paste this URL into the MCP Server URL field in ChatGPT
- Authentication: The authentication method will be set to OAuth automatically
- Check the box to confirm you understand the “beta” nature of custom connectors
- Click Create
Step 4: Authorize the connection
Section titled “Step 4: Authorize the connection”- After clicking “Create,” you will be redirected to the Keboola platform to authorize the connection
- Sign in to your Keboola account if prompted
- Select the specific Keboola project you want to connect to
- Once authorized, you will be redirected back to ChatGPT
- A confirmation message “Keboola is now connected” will appear at the top of the screen
Step 5: Use the connector in a chat
Section titled “Step 5: Use the connector in a chat”To use the custom connector you’ve created, you must explicitly enable Developer Mode in the chat interface:
- Start a new chat
- Click on the “Add photos & files” icon
- Hover over the “More” option
- From the expanded menu, select “Developer Mode”
- This will change the prompt box to indicate that developer mode is active
- You will see an option to select your custom connector (e.g., a button labeled “Keboola”)
- Click on the “Keboola” button to enable it for this specific conversation
You can now ask questions related to your Keboola data, and ChatGPT will use the connector to access the information. For example: “What data tables are in my project?” or “Show me the latest job runs.”
Using with Cursor
Section titled “Using with Cursor”Click the button related to your region below:
| Stack (Region) | Cursor Deeplink |
|---|---|
| US Virginia AWS (default) |  |
| US Virginia GCP (us-east4) | |
| EU Frankfurt AWS (eu-central-1) | |
| EU Ireland Azure (north-europe) | |
| EU Frankfurt GCP (europe-west3) | |
Alternatively, you can:
- Navigate to Keboola project settings, click
Users & Settings>MCP Server. - Click the Cursor tab.
- Click the “Install In Cursor” button.
- You’ll be prompted to login into your Keboola account and select the project you want to connect to.
Using with Windsurf
Section titled “Using with Windsurf”Windsurf supports MCP through its native integration with Cascade. You can add Keboola’s MCP Server in two ways:
Option 1: Manual configuration (recommended)
Section titled “Option 1: Manual configuration (recommended)”- Open the Windsurf settings and navigate to
Cascade>Plugins - Click on “Add MCP Plugin” or edit the
mcp_config.jsonfile directly - Add the Keboola MCP Server configuration:
{ "mcpServers": { "keboola": { "serverUrl": "https://mcp.<YOUR_REGION>.keboola.com/mcp" } }}- Replace
<YOUR_REGION>with your specific stack URL from the available stack URLs - Press the refresh button after adding the configuration
- You’ll be prompted to authenticate with your Keboola account and select the project
For detailed instructions and troubleshooting, see the Windsurf MCP documentation.
Using with VS Code
Section titled “Using with VS Code”VS Code supports MCP servers through GitHub Copilot’s agent mode. Follow these steps to set up Keboola’s MCP Server:
Prerequisites
Section titled “Prerequisites”- VS Code with GitHub Copilot extension installed
- GitHub Copilot subscription (Pro, Business, or Enterprise)
Setup instructions
Section titled “Setup instructions”- Open VS Code and ensure you have the latest version of the GitHub Copilot extension
- Open the Command Palette (
Ctrl+Shift+P/Cmd+Shift+P) and run “MCP: Configure Servers” - This will create or open your MCP configuration file (
mcp.json) - Add the Keboola MCP Server configuration:
{ "servers": { "keboola": { "command": "npx", "args": [ "mcp-remote", "https://mcp.<YOUR_REGION>.keboola.com/mcp" ] } }}- Replace
<YOUR_REGION>with your specific stack URL from the available stack URLs - Save the configuration file
- Restart VS Code or run “MCP: Restart Servers” from the Command Palette
- You’ll be prompted to authenticate with your Keboola account and select the project
Using MCP tools in VS Code
Section titled “Using MCP tools in VS Code”- Open the Chat view and enable agent mode
- Select the Tools button to see available Keboola tools
- Use
#in your chat to reference specific tools or resources - The tools will be available with up to 128 tools per request
For detailed setup and troubleshooting, see the VS Code MCP documentation.
Using with Make
Section titled “Using with Make”- Create your scenario in Make.
- Use the MCP Client component within the scenario.
- In the dropdown of the MCP Client, select Keboola.
- Navigate to Keboola project settings, click
Users & Settings>MCP Server. - Click the Make tab.
- Copy the integration URL displayed there into the MCP Client configuration in Make.
Next steps
Section titled “Next steps”- Reference — the tools your client can use and how to restrict them.